Azure Migrate – Azure Migration Tool only supports Windows Server 2003 in VM format to be migrated to Azure, It is not support for physical Windows Server 2003. This post will guide you how to migrate physical Windows Server 2003 to Azure by using Azure Migrate – Azure Migration Tool.
The steps for the whole migration will be:
- Physical-to-Virtual (P2V) Windows Server 2003 in VHD format
- Create VM from the VHD in Hyper-V Environment
- Enable Replication for Windows Server 2003 from Hyper-V to Azure
- Verify the Windows Server 2003 Azure VM is bootable
The above steps will be the whole process for the migration, but sometimes you may face some specific error during the step 2, which will be discussed later.
Step 1 – Physical-to-Virtual (P2V) Windows Server 2003 in VHD format:
We will use Disk2vhd for creating VHD from Windows Server 2003, please be noted that you need to remove all the useless driver before P2V like Dell, IBM driver etc.
Step 2 – Create VM from the VHD in Hyper-V Environment:
This step seems simple but sometimes you will get the following screen error,
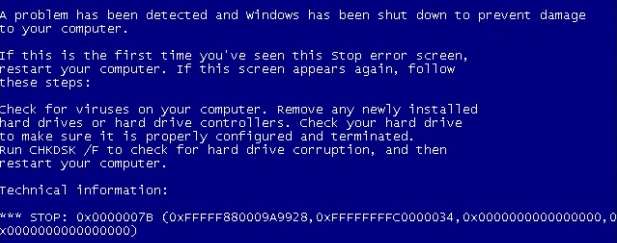
In this case we have to mount the VHD to another Windows Server and open the mounted disk.
Then follow the steps below.
- Check the file system and Confirm Files Exist:
windows\system32\drivers\intelide.sys
windows\system32\drivers\atapi.sys
- Edit the Registry on the mounted drive:
Locate the SYSTEM registry on the mounted drive and mount it, then confirm the below Registry Entries Exist
HKEY_LOCAL_MACHINE\ITmugDC\ControlSet001\Services\IntelIde
HKEY_LOCAL_MACHINE\ITmugDC\ControlSet001\Services\PCIIde
HKEY_LOCAL_MACHINE\ITmugDC\ControlSet001\Services\atapi
HKEY_LOCAL_MACHINE\ITmugDC\ControlSet001\Control\CriticalDeviceDatabase\pci#ven_8086&dev_7111
HKEY_LOCAL_MACHINE\ITmugDC\ControlSet001\Control\CriticalDeviceDatabase\pci#ven_8086&dev_7110&cc_0601
HKEY_LOCAL_MACHINE\ITmugDC\ControlSet001\Control\CriticalDeviceDatabase\primary_ide_channel
HKEY_LOCAL_MACHINE\ITmugDC\ControlSet001\Control\CriticalDeviceDatabase\secondary_ide_channel
Create registry files mentioned below, and run it if there is missing Entries in order to regenerate Entries
Create file “IntelIde.reg”
[HKEY_LOCAL_MACHINE\ITmugDC\ControlSet001\Services\IntelIde]
“ErrorControl”=dword:00000001
“Group”=”System Bus Extender”
“Start”=dword:00000000
“Tag”=dword:00000004
“Type”=dword:00000001
Create file “PCIIde.reg”
[HKEY_LOCAL_MACHINE\ITmugDC\ControlSet001\Services\PCIIde]
“ErrorControl”=dword:00000001
“Group”=”System Bus Extender”
“Start”=dword:00000000
“Tag”=dword:00000003
“Type”=dword:00000001
“ImagePath”=hex(2):73,00,79,00,73,00,74,00,65,00,6d,00,33,00,32,00,5c,00,44,00,\
52,00,49,00,56,00,45,00,52,00,53,00,5c,00,70,00,63,00,69,00,69,00,64,00,65,\
00,2e,00,73,00,79,00,73,00,00,00
“DisplayName”=”Standard IDE/ESDI Hard Disk Controller”
Create file “atapi.reg“
[HKEY_LOCAL_MACHINE\ITmugDC\ControlSet001\Services\atapi]
“ErrorControl”=dword:00000001
“Group”=”SCSI miniport”
“Start”=dword:00000000
“Tag”=dword:00000019
“Type”=dword:00000001
“DisplayName”=”Standard IDE/ESDI Hard Disk Controller”
“ImagePath”=hex(2):73,00,79,00,73,00,74,00,65,00,6d,00,33,00,32,00,5c,00,44,00,\
52,00,49,00,56,00,45,00,52,00,53,00,5c,00,61,00,74,00,61,00,70,00,69,00,2e,\
00,73,00,79,00,73,00,00,00
Create file “dev_7111.reg”
[HKEY_LOCAL_MACHINE\ITmugDC\ControlSet001\Control\CriticalDeviceDatabase\pci#ven_8086&dev_7111]
“ClassGUID”=”{4D36E96A-E325-11CE-BFC1-08002BE10318}”
“Service”=”intelide”
Create file “dev_7110.reg”
[HKEY_LOCAL_MACHINE\ITmugDC\ControlSet001\Control\CriticalDeviceDatabase\pci#ven_8086&dev_7110&cc_0601]
“ClassGUID”=”{4D36E97D-E325-11CE-BFC1-08002BE10318}”
“Service”=”isapnp”
Create file “primary_ide.reg”
[HKEY_LOCAL_MACHINE\ITmugDC\ControlSet001\Control\CriticalDeviceDatabase\primary_ide_channel]
“Service”=”atapi”
“ClassGUID”=”{4D36E96A-E325-11CE-BFC1-08002BE10318}”
Create file “secondary_ide.reg”
[HKEY_LOCAL_MACHINE\ITmugDC\ControlSet001\Control\CriticalDeviceDatabase\secondary_ide_channel]
“Service”=”atapi”
“ClassGUID”=”{4D36E96A-E325-11CE-BFC1-08002BE10318}”
Normally, it should be bootable by following the above steps, but sometimes you will face black screen issue.
- Copy the 3 files from C:\WINDOWS\ServicePackFiles\i386 to c:\WINDOWS\system32
halmacpi.dll
ntkrnlmp.exe
ntkrpamp.exe - Edit boot.ini. This post show you the detail instruction to open and save boot.ini since it is a system file.
Under [operating systems], duplicate your current active boot option to a second line. Append the following options at the end: /KERNEL=ntkrnlmp.exe /HAL=halmacpi.dll
You can also change the description so you can tell which options are which.
E.G. (below should be all on one line)
multi(0)disk(0)rdisk(0)partition(1)\WINDOWS=”Windows Server 2003, ACPI MPS” /fastdetect /NoExecute=OptOut /KERNEL=ntkrnlmp.exe /HAL=halmacpi.dll
- Boot your VM and select the new boot option.
- Windows will boot in to multi processor mode, detect it is ACPI MPS, install the new HAL and ask you to reboot again.
- Boot using your normal boot.ini entry and the VM will now see all your processors.
Step 3 – Enable Replication for Windows Server 2003 from Hyper-V to Azure
Based on it is Windows Server 2003, you must manually configure the SAN policy as Online All and Install Hyper-V Guest Integration,
For simple, also please disable the windows firewall for make sure the RDP is functional and no restriction about IP & ports control because there is no any Azure VM agent for Windows Server 2003, it means you will not be able to reset the RDP setting in the Azure Portal after the Azure VM provisioned.
Step 4 – Verify the Windows Server 2003 Azure VM is bootable
It should be bootable by following the above steps, The Azure Environment is similar as Hyper-V environment.
Eric Chan
Microsoft MVP
SOS Group Limited